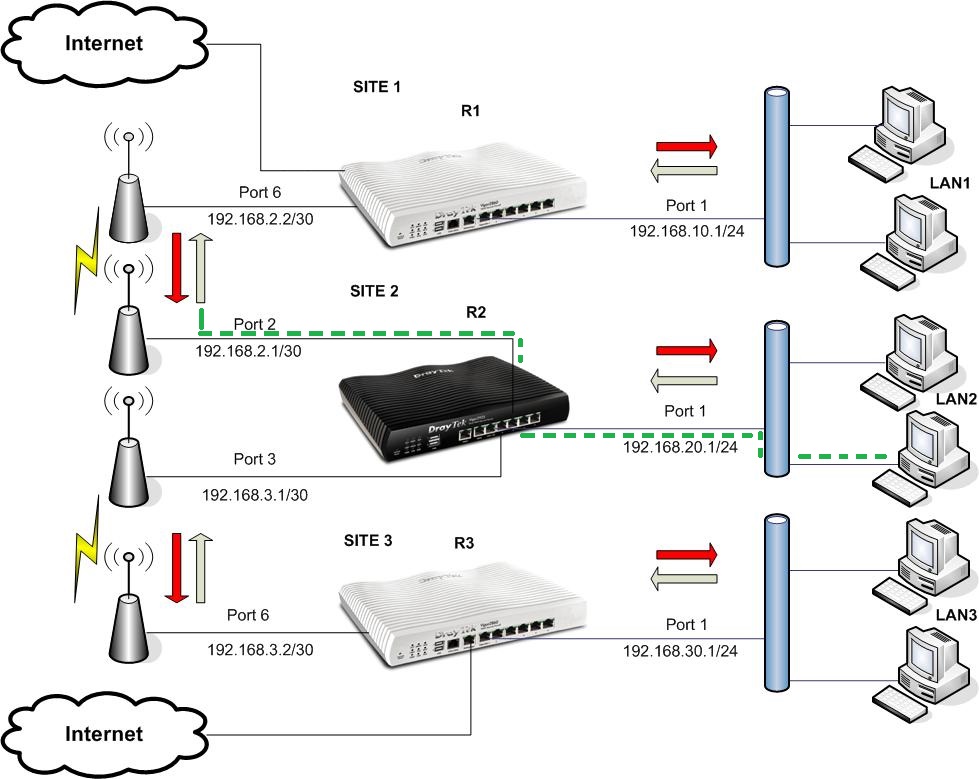
In this scenario, we will configure a LAN to LAN static route using Draytek routers that link with a point to point wireless bridge. The LANs (LAN1, LAN2, and LAN3) on site (SITE 1, SITE 2, and SITE 3) can access each other through the routers (R1, R2, and R3) and LAN2 in Site 2 will have internet connection via Site 1 using Route Policy.
Step 1: Configure Router R1
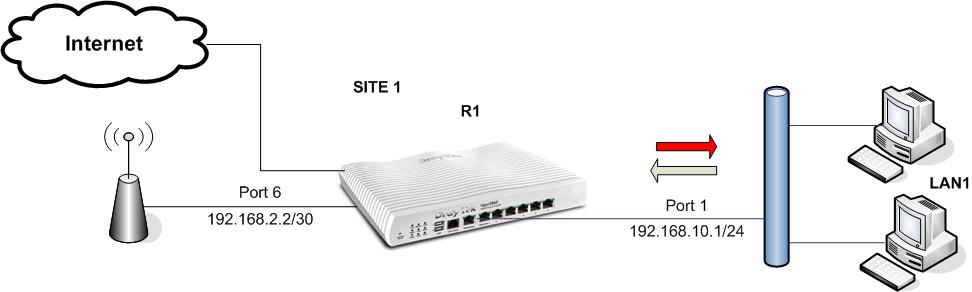
1. Assign a network subnet to Port 1.
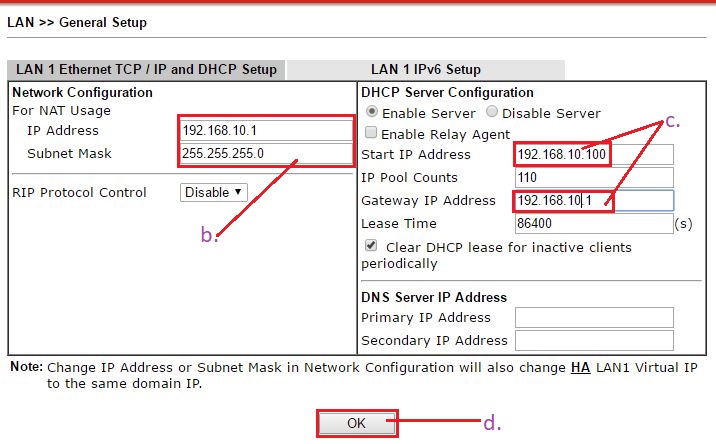
a. Go to LAN>>General Setup, click Details Page under LAN1.


b. Enter IP address as 192.168.10.1 and Subnet Mask as 255.255.255.0
c. Under DHCP Server Configuration, enter Start IP address 192.168.10.100 and Gateway IP address 192.168.10.1
d. Click OK to save your settings.
2. Activate port 6 and assign a network subnet.
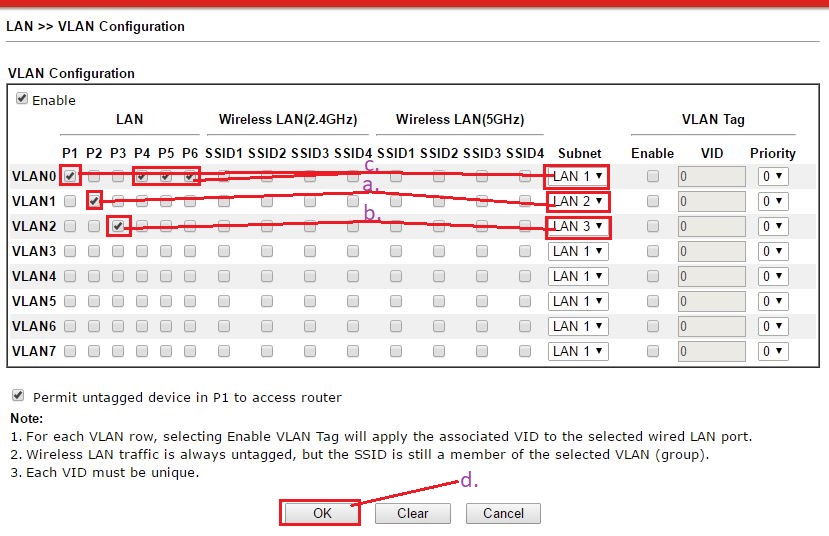
a. Go to LAN>>VLAN, tick P6 under VLAN1 and select LAN2 as subnet.
b. Tick all the remaining ports (P1-P5) under VLAN0 and LAN1 as subnet.
c. Click OK to save your settings.


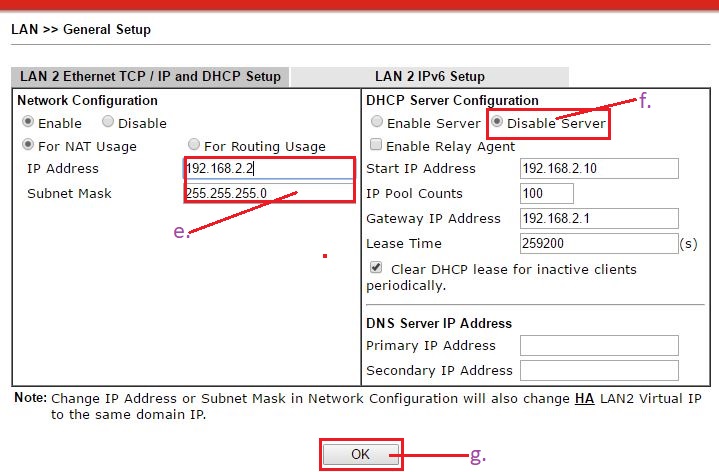
d. Go to LAN>>General Setup, click Details Page under LAN2.

e. Enter IP address 192.168.2.2 and subnet mask 255.255.255.0
f. Under DHCP Server Configuration, select Disable Server.
g. Click OK to save your settings.
3. Configure Static Routes.
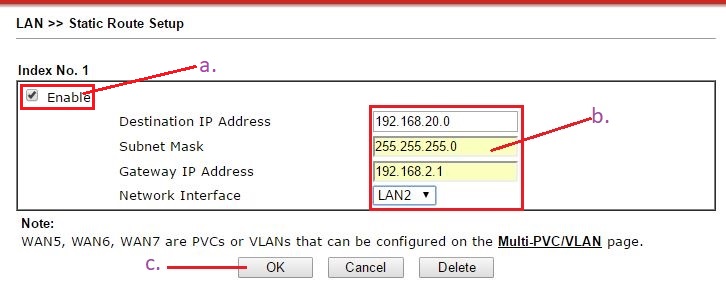
a. Go to LAN>>Static Route, select index 1 and tick Enable.
b. Enter the following below:
- Destination IP address = 192.168.20.0
- Subnet Mask = 255.255.255.0
- Gateway IP address = 192.168.2.1
- Network Interface = LAN2
c. Click OK to save your settings.


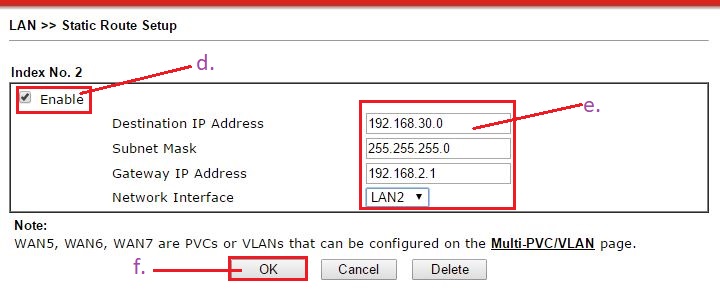
d. Select Index 2 and tick Enable.
e. Enter the following below:
- Destination IP address = 192.168.30.0
- Subnet Mask = 255.255.255.0
- Gateway IP address = 192.168.2.1
- Network Interface = LAN2
f. Click OK to save your settings.

Step 2: Configure Router R2

1. Assign a network subnet to Port 1.
a. Go to LAN>>General Setup, click Details Page under LAN1.
b. Enter IP address as 192.168.20.1 and Subnet Mask as 255.255.255.0
c. Under DHCP Server Configuration, enter Start IP address 192.168.20.100 and Gateway IP address 192.168.20.1
d. Click OK to save your settings.

2. Activate port 2 and port 3 and assign a network subnet.
a. Go to LAN>>VLAN, tick P2 under VLAN1 and LAN2 as subnet.
b. Tick P3 under VLAN2 and select LAN3 as subnet.
c. Tick the remaining ports (P1, P5 and P6) under VLAN0 and LAN1 as subnet.
d. Click OK to save your settings.
e. Go to LAN>>General Setup, click Details Page under LAN2.

f. Enter IP address 192.168.2.1 and subnet mask 255.255.255.0
g. Under DHCP Server Configuration, select Disable Server.
h. Click OK to save your settings.

i. Go to LAN>>General Setup, click Details Page under LAN3.

j. Enter IP address 192.168.3.1 and subnet mask 255.255.255.0
k. Under DHCP Server Configuration, select Disable Server.
l. Click OK to save your settings.

3. Configure a route policy for internet connection.
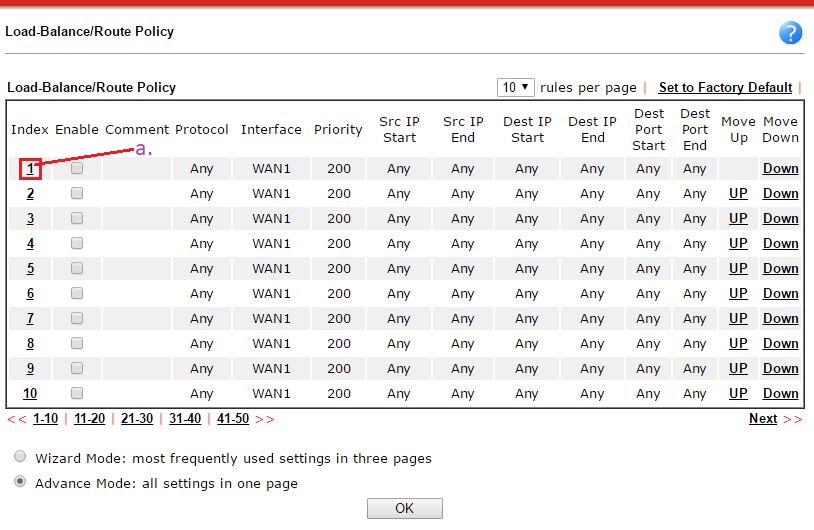
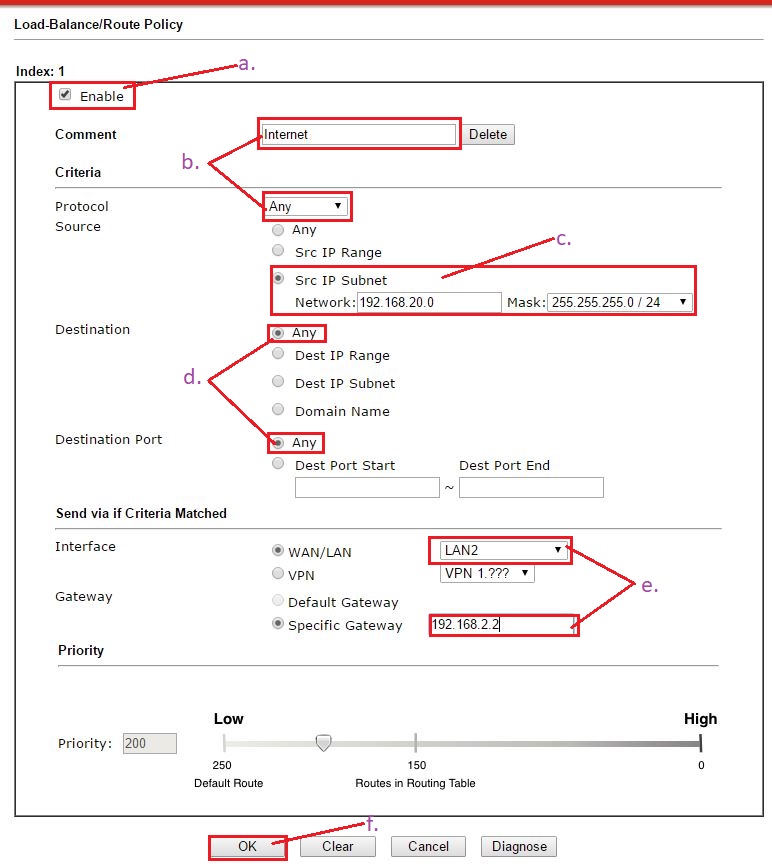
a. Go to Load Balance/Route Policy>>General Setup, select index 1 and tick Enable.

b. Comment as “Internet” and select Protocol as Any.
c. Select Src IP subnet and enter IP address 192.168.20.0 and subnet mask 255.255.255.0/24
d. Select Destination and Destination Port as Any.
e. Under “Send via if Criteria Matched”, Interface is LAN2 and Specific Gateway is 192.168.2.2
f. Click OK to save your settings.
4. Configure Static Routes.
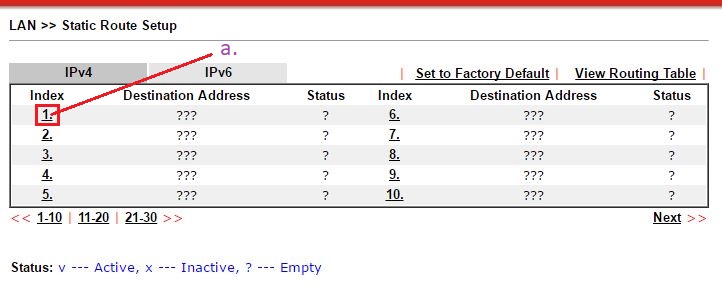
a. Go to LAN>>Static Route, select index 1 and tick Enable.
b. Enter the following below:
- Destination IP address = 192.168.10.0
- Subnet Mask = 255.255.255.0
- Gateway IP address = 192.168.2.2
- Network Interface = LAN2
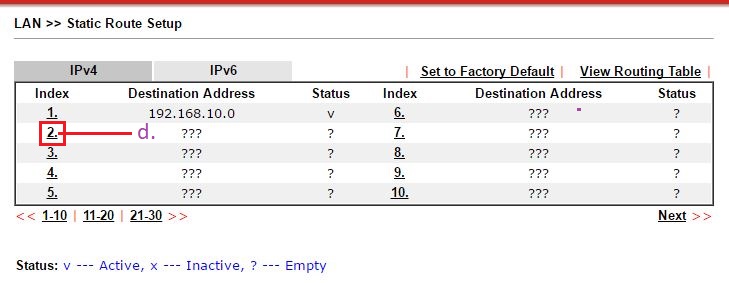
c. Click OK to save your settings.

d. Select Index 2 and tick "Enable"
e. Enter the following below:
- Destination IP address = 192.168.30.0
- Subnet Mask = 255.255.255.0
- Gateway IP address = 192.168.3.2
- Network Interface = LAN3
f. Click OK to save your settings.
Step 3: Configure R3

1. Assign a network subnet to Port 1.
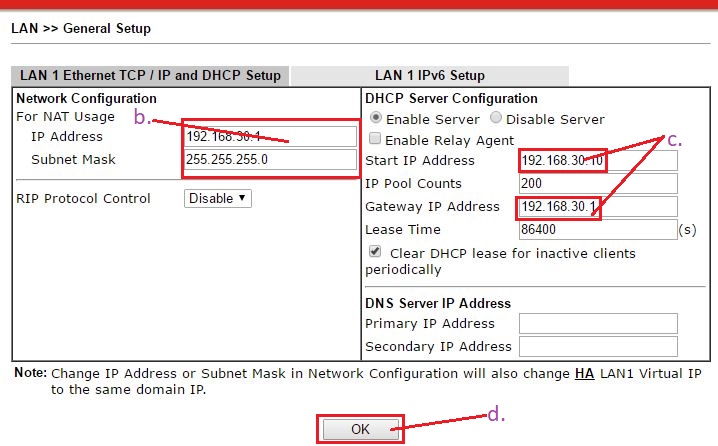
a. Go to LAN>>General Setup, click Details Page under LAN1.
b. Enter IP address as 192.168.30.1 and Subnet Mask as 255.255.255.0
c. Under DHCP Server Configuration, enter Start IP address as 192.168.30.100 and Gateway IP address as 192.168.30.1
d. Click OK to save your settings.
2. Activate port 6 and assign a network subnet.
a. Go to LAN>>VLAN, tick P6 under VLAN1 and select subnet as LAN3.
b. Tick all the remaining ports (P1-P5) under VLAN0 and LAN1 as subnet.
c. Click OK to save your settings.

d. Go to LAN>>General Setup, click Details Page under LAN2.

e. Enter IP address 192.168.3.2 and subnet mask 255.255.255.0
f. Under DHCP Server Configuration, select Disable Server.
g. Click OK to save your settings.

3. Configure Static Routes.
g. Go to LAN>>Static Route, select index 1 and tick Enable.
h. Enter the following below:
- Destination IP address = 192.168.20.0
- Subnet Mask = 255.255.255.0
- Gateway IP address = 192.168.3.1
- Network Interface = LAN3
i. Click OK to save your settings.
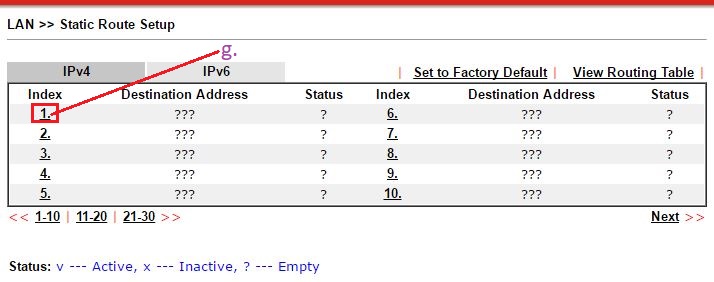

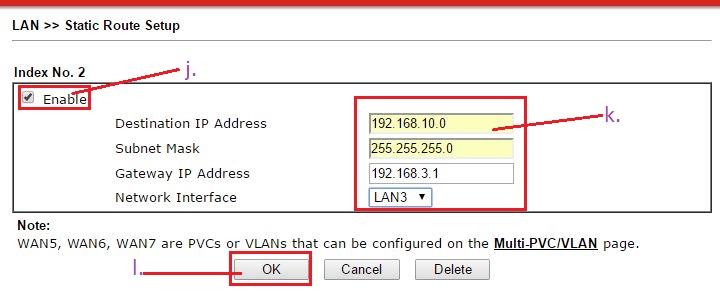
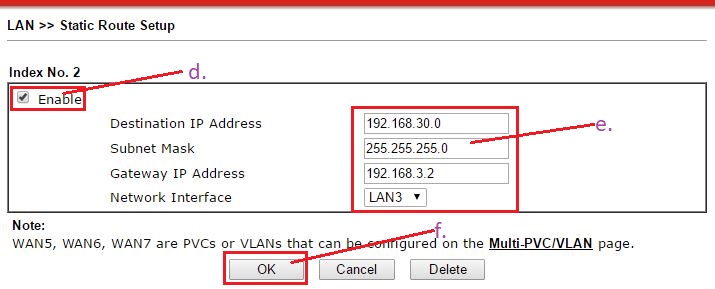
j. Select Index 2 and tick Enable
k. Enter the following below:
- Destination IP address = 192.168.10.0
- Subnet Mask = 255.255.255.0
- Gateway IP address = 192.168.3.1
- Network Interface = LAN3
l. Click OK to save your settings.